Article too long to read?
Color correction is the process of fixing technical issues in video footage, like white balance, exposure, and color consistency, to create a polished look. It’s the first step before applying any stylistic adjustments, known as color grading. For indie filmmakers, this step ensures your film looks professional, even with limited resources or varying lighting conditions.
Key Takeaways:
- Color Correction vs. Grading: Correction fixes technical issues (neutralizing footage), while grading adds mood and style.
- Top Tools: Free options like DaVinci Resolve or beginner-friendly tools like ColorDirector help filmmakers at any skill level.
- Workflow Tips: Start with LOG/RAW footage, adjust exposure and white balance, and use video scopes for accuracy.
- Common Issues Solved: Fix lighting inconsistencies, skin tone problems, and exposure challenges.
Color Correction vs. Color Grading #shorts #colorgrading #colorcorrection
Tools and Software for Color Correction
The right color correction software can elevate the visual quality of your short film. Whether you’re a beginner or a professional, there are plenty of options to fit your needs – ranging from free programs to feature-packed tools with reasonable pricing.
Top Software Options for Color Correction
DaVinci Resolve is a favorite among professionals, offering an impressive free version packed with advanced features like primary and secondary color wheels, auto-balancing tools, and a node-based workflow for precise control. For those seeking more, the Studio version is available for a one-time cost of $295 – no subscriptions required. However, its sophisticated tools come with a learning curve, so it may take time to master.
Adobe Premiere Pro is ideal for those already using the Creative Cloud suite. Its Lumetri Color panel simplifies color correction with one-click adjustments, built-in presets, mask tracking, and robust plug-in support. Priced at $52.99/month, it’s a go-to for editors who value seamless integration across Adobe’s ecosystem.
Final Cut Pro is tailored for Mac users, offering fast rendering and optimized performance. For a one-time payment of $299.99, it provides tools like color wheels, curves, hue/saturation controls, and support for LUTs. It’s a powerhouse for those who prefer an intuitive yet comprehensive editing experience.
ColorDirector is a great choice for beginners on Windows. It combines a user-friendly interface with professional features like AI-driven motion tracking and instant color matching. Best of all, it’s available as a free download, making it an accessible starting point.
Cinema Grade is a plugin designed for Premiere Pro, Final Cut Pro, and DaVinci Resolve. Starting at $69, it features direct on-screen grading with Lightroom-style controls and real-time LUT previews. Its guided process makes it a solid option for filmmakers looking for professional results without extensive training.
| Software | Price | Best For | Learning Curve | Key Strengths |
|---|---|---|---|---|
| DaVinci Resolve | Free / $295 | Professional color work | Steep | Advanced tools, complete feature set |
| Adobe Premiere Pro | $52.99/month | Creative Cloud users | High | Industry standard, excellent integration |
| Final Cut Pro | $299.99 (one-time) | Mac users | High | Optimized performance, fast rendering |
| ColorDirector | Free | Beginners | Easy | User-friendly, professional features |
| Cinema Grade | $69+ | Quick workflow | Easy | Direct on-screen grading, guided process |
Choosing the Right Tool for Your Project
When deciding on software, start by identifying your project’s specific needs. Are you working on a narrative short, a documentary, or something experimental? The type of project can guide your choice, especially if you need tools tailored for storytelling or flexibility in editing.
Budget is another key factor. Many tools offer free versions or trial periods, letting you explore their features before committing financially. If you’re new to color correction or don’t plan to specialize in it, beginner-friendly options like ColorDirector or Cinema Grade might be all you need. On the other hand, if you’re aiming to refine your skills and potentially build a career in color grading, investing time in mastering a tool like DaVinci Resolve could pay off in the long run.
Compatibility with your system is also essential. Mac users might lean toward Final Cut Pro for its optimized performance, while Windows users may appreciate the accessibility of ColorDirector. Balancing features, budget, and system compatibility will help you choose software that grows with your skills and meets your project’s demands.
For newcomers, starting with free or simpler tools can help you learn the basics and define your preferences. Once you’re comfortable, you can upgrade to more advanced options that align with your evolving workflow and budget.
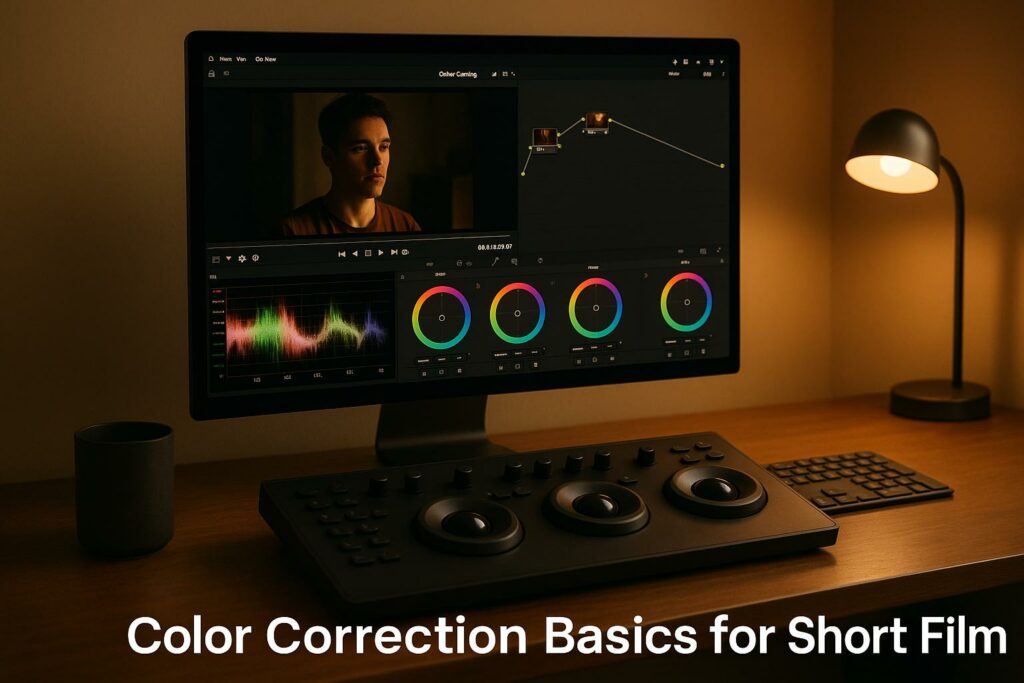
Step-by-Step Color Correction Workflow
Once you’ve chosen the right tool for the job, following a structured workflow can help you achieve polished, professional results. A systematic approach not only saves time but also ensures your work stays consistent. Start with technical adjustments to fix any issues, then move on to creative tweaks that bring your story to life.
Importing and Preparing Footage
Begin by organizing your footage into clearly labeled folders – grouped by scene, day, or any system that makes sense for your project. This organization will make the entire process smoother.
When importing, use LOG or RAW footage to give yourself the most flexibility in post-production. While this type of footage may initially look flat, it holds more data, making it easier to adjust later.
Set your project’s frame rate and resolution to match your footage. This avoids unnecessary slowdowns during editing. Also, configure your timeline to match your delivery format, scaling footage as needed.
Before you dive into color correction, back up your original files. This ensures you have untouched source material in case you need to start over. If you’re working with high-resolution footage on a slower system, consider creating proxy files. These lower-resolution versions of your clips will keep your workflow responsive without sacrificing quality.
Adjusting Exposure and White Balance
Start by addressing exposure issues. Look for clips that stand out as too dark or too bright compared to the rest of the scene, and use your software’s brightness or exposure controls to bring them into alignment. This step establishes a consistent baseline across your footage.
Next, tackle white balance, which can dramatically change the look of your video. Mixed lighting – like a scene lit by both tungsten bulbs and daylight – often creates unwanted color casts. While most software includes automatic white balance tools, manual adjustments give you more control.
To manually adjust white balance, find an object in the shot that should be neutral white or gray. Use the eyedropper tool to sample this area, and the software will adjust the color temperature accordingly. If there’s no neutral reference in the frame, adjust the temperature manually until whites and skin tones appear natural.
For exposure adjustments, use skin tones as a reference point. Properly balanced skin tones can help guide the overall look of your footage.
Using Scopes for Accurate Adjustments
Relying solely on your eyes for color correction can be tricky – your perception adjusts over time, making it harder to spot inconsistencies. That’s where video scopes come in. They provide objective data to help you make precise adjustments, regardless of your monitor’s calibration or lighting conditions.
- The Luma Waveform measures brightness levels across your image. Use it to ensure black levels are at 0 IRE and white levels at 100 IRE for standard dynamic range footage. This prevents clipping, preserving details in both shadows and highlights while maximizing the available brightness range.
- The RGB Parade breaks down the red, green, and blue channels. It’s invaluable for spotting color imbalances. For example, if the red channel is higher than the others in areas that should be white, your footage likely has a warm color cast that needs adjustment.
- The Vectorscope shows hue and saturation, making it especially helpful for skin tones. Skin tones should generally fall along specific areas on the scope, and professional colorists use this tool to maintain consistency across shots.
By using these scopes, you can make adjustments with confidence and ensure your footage is technically sound before moving on to creative refinements.
Applying Primary and Secondary Corrections
Primary corrections affect the entire image and are your first step toward creating a balanced, neutral look. These adjustments include exposure, contrast, saturation, and overall color balance – essentially setting the foundation for your footage.
Start by adjusting contrast using controls like lift, gamma, and gain (often labeled as shadows, midtones, and highlights). Lift adjusts the darkest parts of the image, gamma handles midtones, and gain brightens the highlights. Small, precise tweaks can significantly enhance the depth and visual appeal of your footage.
Once the primary corrections are in place, move on to secondary corrections, which allow you to target specific areas or colors. For example, you might brighten an actor’s face without affecting the background or enhance the blue of a sky without altering other colors in the frame. Most editing software offers tools like masks, color range selection, or power windows for these adjustments.
Keep secondary corrections subtle. Overdoing it can make your footage look unnatural and distract from the story. Instead, use these tools to gently guide the viewer’s focus or enhance the mood of a scene.
This is also the phase where you’ll handle color matching between shots. If a master shot and close-ups don’t quite align, secondary tools can help bring them together. Start with skin tones, as they’re often the most noticeable, then fine-tune other elements as needed. Sometimes, a small tweak to one problematic shot can make an entire sequence feel cohesive.
While technical accuracy is important, the emotional impact of your color choices is what truly connects with your audience. Use this workflow as a foundation, but don’t hesitate to take creative risks when your vision calls for it.
sbb-itb-376fc17
Key Techniques and Best Practices for Color Correction
Mastering color correction is about more than just fixing technical issues – it’s about crafting a visual language that aligns with your story. These techniques will help you create a polished and cohesive look that enhances your film’s narrative.
Maintaining Consistent White Balance
Getting white balance right is crucial. Even minor shifts in color temperature can disrupt the viewer’s immersion. Start by choosing a key shot in each scene to serve as your reference point for color temperature. This will act as your baseline throughout the project.
If you’re using multiple cameras, ensure they’re all set to the same white balance during filming – this can save hours in post-production. For transitions like cutaways or inserts, refer back to stills from your key shot to ensure a seamless flow. In scenes with mixed lighting, aim to preserve the natural warmth or coolness of the environment rather than forcing a neutral tone. Once the white balance is consistent, fine-tune the exposure and contrast to add depth and dimension.
Balancing Exposure and Contrast
Exposure and contrast are the backbone of your footage’s visual depth. Drawing inspiration from the zone system, aim to capture a full range of tones – from rich blacks to crisp whites – while maintaining balanced midtones.
Pay special attention to skin tones, as they ground the image in realism. Adjust contrast to match the mood of the scene: softer contrasts for intimate or tender moments, and stronger contrasts for heightened drama. To avoid harsh highlights, use a gradual rolloff to retain detail and prevent clipping.
Using LUTs for Efficiency
Look-Up Tables (LUTs) can save time and provide a solid foundation for your color work. Use technical LUTs to convert flat footage into Rec.709 and creative LUTs to establish a specific style or mood.
However, treat LUTs as a starting point, not an end-all solution. Apply them with care to avoid an over-processed appearance, and fine-tune them as needed to fit the unique needs of your project. Many professionals create custom LUTs based on a meticulously graded reference shot, ensuring consistency across scenes and lighting changes.
Managing Noise and Grain
Digital noise, especially in underexposed areas, can undermine the professional quality of your film. Address noise early in post-production to preserve the image’s integrity. Multi-frame noise reduction techniques are particularly effective, as they can differentiate between noise and important details better than single-frame methods.
If you decide to add film grain for a creative effect, do so only after completing your technical corrections. This ensures the grain feels like an intentional artistic choice rather than an unintended artifact.
Using Color to Support Your Story
Once technical adjustments are complete, let your story guide your color choices. Color correction plays a key role in setting the emotional tone of your film. Complementary color schemes can highlight key subjects and create visual interest. While the classic orange-and-teal look is popular for emphasizing skin tones, don’t be afraid to explore other combinations that might better suit your narrative.
Subtle shifts in color temperature can mirror character arcs or changes in mood. For instance, warmer tones might evoke hope or transformation, while cooler tones can suggest isolation or unease. Adjusting saturation and selectively desaturating elements can further refine the emotional impact – vivid colors convey energy, while muted tones enhance realism or melancholy.
The best color correction is invisible to the audience, seamlessly blending into the story and enhancing its emotional resonance without drawing attention to itself.
Common Problems and How to Fix Them
Indie filmmakers often encounter color correction challenges that can disrupt the polished look of their projects. But with the right techniques, these issues can be resolved effectively.
Fixing Inconsistent Lighting
Inconsistent lighting can break the visual flow of a scene. To address this, start by selecting a reference shot – ideally, the best-lit shot in your sequence. Use this as your baseline and adjust the rest of the shots to match it. Tools like color wheels or RGB curves are particularly helpful here. Focus on aligning shadows, midtones, and highlights across all shots.
If the color temperature varies, you can warm up cooler shots or cool down warmer ones until they feel cohesive. For scenes with mixed lighting conditions, aim for a natural progression of tones. For shots with extreme exposure differences, secondary corrections can target specific parts of the frame, allowing you to brighten dark areas or tone down overly bright sections without affecting the entire image. Once the lighting is balanced, fine-tune skin tones to ensure they look natural and consistent.
Correcting Skin Tone Problems
Skin tone issues often stem from improper white balance or unwanted color casts. Start by ensuring the white balance is correct. Then, tweak exposure, contrast, and vibrance to bring out natural tones. Use tools like color wheels or curves to neutralize any unwanted tints in the midtones. For example, if skin tones appear too green, adding a touch of magenta can help restore balance.
Many editing programs, such as Adobe Premiere Pro, offer features like Color Match to preserve natural skin tones across different shots. Secondary corrections are also useful for isolating and adjusting skin tones without altering the rest of the image. If your footage was shot in a LOG profile, applying a conversion LUT to Rec.709 color space provides a strong starting point for accurate color grading. Once skin tones look natural, address any remaining exposure issues to enhance the overall quality of your footage.
Recovering Overexposed or Underexposed Footage
Fixing exposure problems can be tricky but not impossible. For overexposed footage, start by gently reducing the highlights – though fully blown-out areas cannot be recovered. Avoid making aggressive adjustments, as they can create a flat, unnatural appearance. For underexposed footage, carefully lift the shadows while monitoring your scopes to retain the richness of the blacks. Noise reduction may also be necessary to maintain detail in darker areas.
Using an approach inspired by the zone system can help distribute tones evenly across the range, preserving midtones and maintaining a balanced contrast. If full recovery isn’t possible, consider whether the exposure issue can work as a creative choice. Slight underexposure might enhance a moody atmosphere, while overexposed areas could convey the intensity of bright sunlight.
Mastering Color Correction Skills
Taking your color correction abilities to the next level requires practice, experimentation, and a solid understanding of professional tools. While technical strategies and troubleshooting are essential, true mastery comes from refining your workflow and developing a sharp eye for detail.
Color correction isn’t something you perfect overnight. It’s about consistently tweaking elements like brightness, saturation, and hue across your clips to create a cohesive, natural look. This process lays the groundwork for continuous improvement and creative exploration.
To sharpen your skills, immerse yourself in professional tools. DaVinci Resolve is a fantastic place to start. Originally built for color correction, it offers a robust set of features – even in its free version. Other powerful tools worth exploring include Adobe Premiere Pro with Lumetri, Final Cut Pro, and Avid. These programs not only provide the technical resources you need but also help you adapt to industry standards.
Feedback is another crucial element in mastering color correction. Collaborating with peers or mentors can reveal blind spots in your work and teach you how to critique your own corrections effectively. During feedback sessions, dive into discussions about how color choices influence a film’s mood and narrative. Understanding how directors and collaborators translate emotions and storytelling into technical adjustments will deepen your ability to make purposeful corrections.
Finally, don’t shy away from challenging footage. Experimenting with clips shot in different lighting conditions or dealing with tricky skin tones will push your limits and build confidence. Every project you tackle – whether it’s dealing with mixed lighting or achieving consistency across scenes – teaches you valuable lessons. These experiences not only refine your technical expertise but also enhance your ability to use color as a powerful storytelling tool.
FAQs
What’s the difference between color correction and color grading, and why does it matter for short films?
Color correction focuses on addressing technical issues like exposure, white balance, and color consistency to ensure your footage appears natural and visually uniform. On the other hand, color grading is where creativity comes into play – adjusting colors, contrast, and tones to create a specific mood or style that enhances the story you’re telling.
Knowing the difference between these two steps is key to tackling post-production effectively. Begin with color correction to make sure your visuals are technically polished. Then, move on to color grading to infuse your project with the artistic touch it needs. This approach is especially important in short films, where every frame must deliver both clarity and emotional impact.
What’s the best color correction software for short films if I’m on a budget or just starting out?
For those just starting out or working with tight budgets, DaVinci Resolve stands out as a fantastic option. This free, professional-grade software comes packed with powerful color correction tools, all wrapped in an easy-to-navigate interface – ideal for tackling short film projects.
What’s even better? While it’s approachable for beginners, DaVinci Resolve also includes advanced features that can keep up as your skills improve. Whether you’re a novice dipping your toes into filmmaking or a seasoned pro, this software adapts to your needs, making it a solid choice for creators at any level.
What are the most common mistakes to avoid in color correction for short films?
To make your short film look polished and professional, steer clear of these common color correction missteps:
- Over-saturating colors: Pushing colors too far can result in an artificial look that pulls attention away from your story.
- Inconsistent color matching: When colors or skin tones vary between shots, it disrupts the flow and breaks the audience’s immersion.
- Going overboard with contrast or brightness: Over-adjusting these elements can throw off the mood and leave your film looking unrefined.
Stick to subtle, well-balanced adjustments and maintain consistency across every shot. This approach helps create a seamless, cinematic feel.
Related Blog Posts
About the Author

Related Posts

No comments yet.
Got Something to add to this article?
Your email address will not be published. Required fields are marked *